
I need to do this almost always whenever I create a New Lightsail instance to host a WordPress website. That is primarily because, I do all the WordPress on a Staging server, and once done, I just download the entire thing using the All In One Migration plugin and then, pull the same on the new server to move the website to its final destination, the Production Server.
This post is not about how to migrate a WordPress website from Staging Server to Production. If you would like to read something on that subject, feel free to read this guide to moving a WordPress website from an Amazon EC2 instance to a Lightsail instance.
This post is about something that needs to be done one step before you actually start migrating the WordPress website from Staging to the Live Server.
How To Allow Uploading large files in PHP?
In short, the following is what needs to be updated in the php.ini file:
- upload_max_filesize = 5000M
- post_max_size = 5000M
- max_input_time = 500
- max_execution_time = 500
Why Do We Need To Increase The PHP File Upload Limit?
Well, that is because, unless your website is super basic and without many, if at all any, images, your download file generated by All In One Migration is bound to be a few hundred MBs, at least. And, Amazon Lightsail by default, allows filesize up to 80MB only, to be uploaded.
So, the PHP file upload size limit needs to be increased. And the way we can do that is by updating the system’s php.ini file.
Location of php.ini file on an Amazon Lightsail System
To be able to make changes in the php.ini file, you will first have to locate it on the Lightsail server. It is located at the following location:
/opt/bitnami/php/etc/php.iniMy favorite editor on Linux is vim so, I use the same to update the php.ini file.
How To Update php.ini file on Amazon Lightsail Instance?
Connect to the server using SSH and use the following command to open the php.ini file in vim.
sudo vim /opt/bitnami/php/etc/php.ini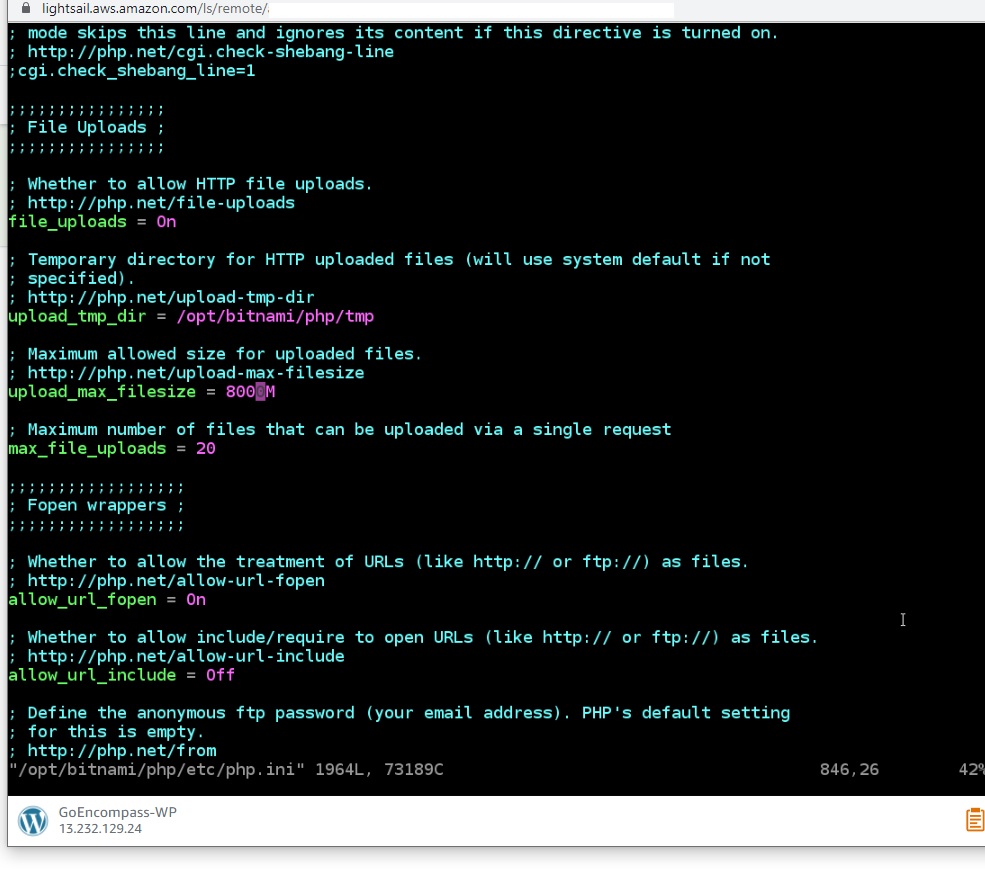
This will open the file in read mode and it will look something like this.
Now, you have to find the two variables and change their values to something higher, as per your need.
First, find the variable (by pressing / to go to search mode in vim) post_max_size, go into insert mode y pressing i (if you are using vim), change the value to, say 8000M, and then press Esc to go our of write mode and then type :wq to save the changes.

Repeat the above process to find the next variable to be updated, upload_max_filesize, and change it to the same value as updated in the previous variable, 8000M.
Now, in order for the changes to take effect, you will need to restart the server including PHP. You can do that by typing:
sudo /opt/bitnami/ctlscript.sh restart
That’s it!
Once the server restart is completed successfully, your new upload should reflect and you should be able to upload files up to 8GB (in this case).


2 thoughts on “How To Increase or Modify The PHP File Upload Limit on Amazon Lightsail Instance?”
Pingback: How to Increase the File Upload limit in cPanel? - Rajiv Verma
Pingback: How To Fix a Revoked LetsEncrypt SSL Certificate? - Rajiv Verma