
If you are reading this, you already know what an Amazon EC2 server is and what is Amazon Lightsail. Or at-least, you have some idea about the same. So, I will not talk anything about the difference between these two and would rather, dive straight to why I did what I did.
Why I decided to migrate from Amazon EC2 to Lightsail?
The shot answer he is, the cost. As any good web developer should, I always keep an eye on areas where I can manage costs without compromising performance or security. Sometime back, I had moved one of my websites (www.northeastexplorers.in) from shared hosting to an AWS EC2 server, which I had configured to my taste. Over time, I realized, it was an over-kill for this website of mine so, I decided to move it to an Amazon Lightsail instance from the EC2 server it was on, primarily to cut costs by at least 50%, if not more.
How to migrate a website from Amazon EC2 Instance to Amazon Lightsail?
Since the website I was planning to migrate was based on the WordPress platform, the migration was pretty straightforward. If you are migrating a WordPress website from Amazon EC2 Instance to Lightsail, there only 9 steps involved to be precise.
- Login to the WordPress backend of the website to be migrated & create a complete backup
- Register/Login to AWS Lightsail
- Choose your platform & app combo (Linux / Windows)
- Choose your configuration and plan
- Create Lightsail instance
- Get and attach a static IP Address to the instance
- Update A record at your domain host/Update your DNS Setting
- Login to the WordPress Backend and restore EC2 website’s backup
- Terminate your old EC2 Instance
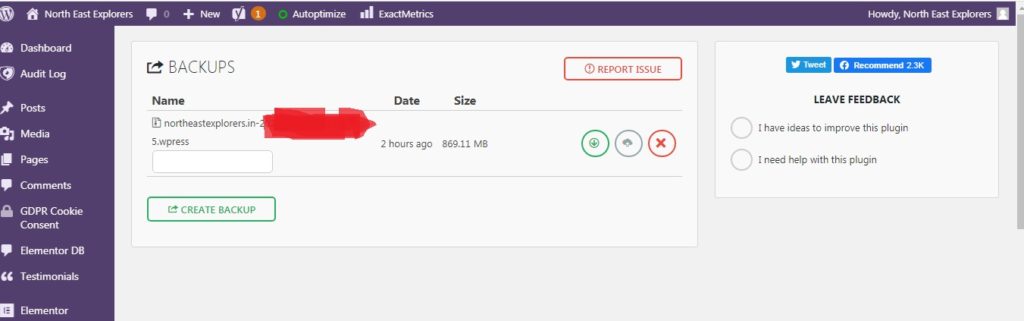
Login to the WordPress backend of the website to be migrated
My first step was to create a complete backup of my website. To that, I used the All-In-One-WP-Migration plugin and this migration guide from EC2 to Lightsail assumes you are familiar with the working of this WordPress migration plugin. It is a very simple plugin so, all you need to do is install & activate it and the rest is self-explanatory. It packs in all the website files and the database in one single file! Once, I downloaded the completed backup file to my computer, I moved to the next step.
Register or Login to AWS Lightsail
Since I already had an AWS account, all I needed to do was go to my Amazon management console and click on Lightsail from under All Services.
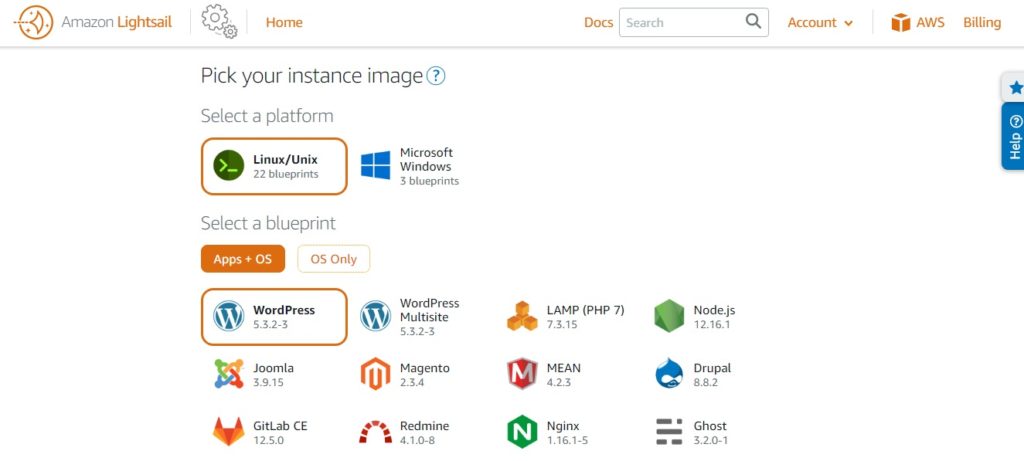
Choose your platform & app combo (Linux / Windows)
From there, I proceeded to create a new Lightsail Instance, which was pretty simple as you will see from the screengrabs given below.
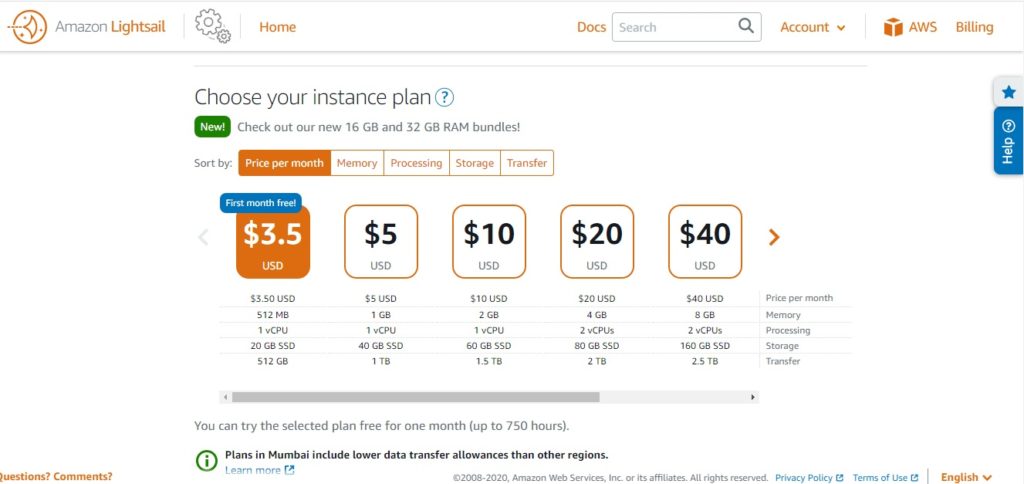
Choosing the configuration & plan
I choose a Linux box for the platform and then, all I wanted to do was host a WordPress website here, I choose the same as my next option, before moving to the next step.
Create Lightsail Instance
Once the configuration and payment details were decided, all I had to do was click Create Instance to fire-up my Lightsail instance. You can give a name to your instance here and then, it takes a few seconds before you see your instance is ready to be used.

Get and attach a static IP Address to the instance
Now, once my instance was ready, the next important thing was to hook it up with a static IP address so that the IP address of the website does not change everytime I restart the server.

To get a static IP on Lightsail, all you have to do is click the Static IP tab above your Instance. Then, you just attach the IP address to your Instance and you are done. Once the IP address is attached to your instance, copy and paste the same on a browser and see if your new website shows up, just to be doubly sure!
Update A record at your domain host/Update your DNS Setting
Now, this is the most critical part of the whole migrating your wordpress website from an EC2 Instance to Lightsail.
Head to your domain control panel and update the relevant settings so that your domain name points to the new static IP that is attached to your Lightsail instance. If you do not know how to point your domain name to an Amazon Lightsail instance, I suggest you go through this update DNS guide to Lightsail Instance.
Before proceeding with the next steps, make sure you see your newly created website instead of your old/main site when you type your domain name. Sometimes, this process takes up to 48 hours. In my case, it was almost immediate.
Once this is done, make sure you install an SSL certificate correctly. Your previous SSL certificate (assuming you had one), will no more work.
Login to the WordPress Backend and restore EC2 website’s backup
Once the new website starts showing up on your domain name, head to the login page of your new website. The username and password combination might be different depending upon what combination of apps you chose while setting up your instance. But if you choose the apps as showed above, your username will be user and you can find your password by typing the following command at your terminal connected to the Lightsail instance.
sudo cat bitnami_credentials
Use this username password combo to login to the backend. The first thing you should do after logging in is install the All In One WP Migration plugin. Once done, activate the plugin and then Import the file you had downloaded, as suggeted in step 1 of this migration guide.

Wait for the upload to complete and then follow the on-screen options to complete the migrations.
Towards the end of it all, you should be successfully done with your website migration from EC2 Server to Lightsail.
Terminate your old EC2 Instance
Last but not the least, once you have verified that every aspect of the website works as expected, you can go ahead and Stop or Terminate the EC2 instance and release the Static IP you had been using there. Also, do not forget to delete any volumes if you have been using.
Please note that, if you do not terminate the instance, you will continue to be charged.
Hope this helps!


17 thoughts on “How To Migrate a WordPress Website From AWS EC2 To Lightsail?”
Pingback: How to Point Your Website to Amazon Lightsail Instance? - Rajiv Verma
Pingback: Install & Renew LetsEncrypt Certificate on Amazon EC2 hosted website
Pingback: How To Create a New AWS Account from scratch?
Pingback: How To Fix Laravel 7.x Specified key was too long error?
Pingback: How to create a custom 404 page in Laravel 7.x? | Rajiv Verma
Pingback: How to access phpMyAdmin to connect to AWS Ubuntu Instance?
Pingback: How to point a domain name to a Lightsail Instance?
Pingback: How to Increase the File Upload limit in cPanel? - Rajiv Verma
Pingback: How to use Rich Text Editor (CKEditor) in Laravel 7, 2020? - Rajiv Verma
Pingback: What do I do if My 2FA token is always invalid? - Rajiv Verma
Pingback: Aws Lightsail Login - login link
Pingback: Aws Lightsail Login - Sales Receipt
Pingback: How To Increase or Modify The PHP File Upload Limit on Amazon Lightsail Instance? - Rajiv Verma
Pingback: How To Renew SSL Using bncert-tool on Amazon Lightsail - Bitnami LAMP Stack? - Rajiv Verma
Pingback: How To Upgrade PHP on Amazon Lightsail in under 15 minutes?
Pingback: [SOLVED] MySQL ERROR 2002 (HY000): Can't connect to local MySQL server through socket On Amazon Lightsail - Rajiv Verma
Pingback: How To Embed Facebook And Twitter Feed On Your Website? - Rajiv Verma