Not long ago, I had written a post about How To Store Data in Google Sheets using Flutter. I recently came across another simpler way to do it. In this approach, I will use Google’s App Script, which I had never even heard about, until recently.
The top-level approach would be something like this:
- Create a new Google Sheet
- Add Columns to the sheet
- Add an App Script to the sheet
- This script will expect an object with the expected data as per our Excel Sheet’s structure
- Read the Data and append it to the Google Sheet
- Create a Flutter app with a simple form to capture data
- Send the Data via HTTP, to the Google App Script
- Show a response
Let’s begin then.
Google App Script Function To Add Data To The Sheet
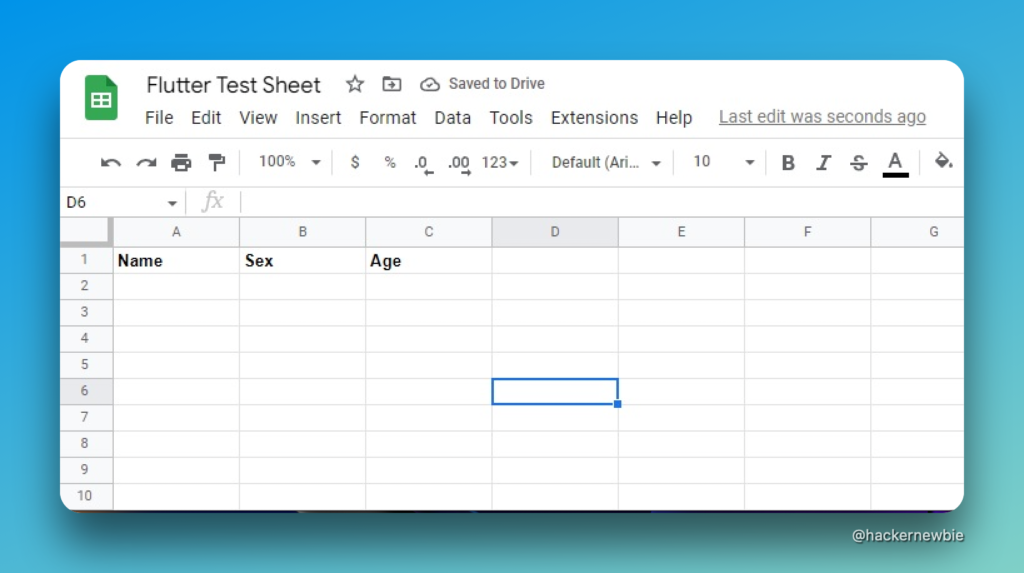
As a first step, let’s create a new Google Sheet. To create a New Google sheet, go here and add a New Blank Spreadsheet from the top section of the page that opens up. Add a few columns to the sheet. In our example, I have created the following 3 columns, Name, Sex, Age.
How To Add App Script To Google Spreadsheet?
With our new Google Sheet created, we will go ahead and create our App Script function. To open the app script panel of the sheet, from the top menu, while on the newly created sheet, go to Extensions -> App Script.
This will open the script window. In our case, since we will be publishing our app as a Web App, we will make use of the doGet function of the Google App Script. This will allow us to read parameters sent to the script over HTTP.
To know more about Google’s App Script, I highly recommend having a look here.
I have barely scratched the surface of the App Script and I can already tell this thing is grossly underrated. Ok, getting back to our task, paste the following code into the script code window.
function doGet(request) {
  var thisSheet = SpreadsheetApp.openById('YOUR_SPREADSHEET_ID_HERE');

  var status = null;

  try{
    var name  =	request.parameter.name;
    var sex   =	request.parameter.sex;
    var age   =	request.parameter.age;

    var newRow = thisSheet.appendRow([name, sex,age])
    status = {"status":"SUCCESS", "message":"Data Inserted Successfuly!"};
  }
  catch(exception){
    status = {"status":"SUCCESS", "message":"Error while inserting data! " + exception};
  }

  return ContentService
			.createTextOutput(JSON.stringify(status))
			.setMimeType(ContentService.MimeType.JSON);
}
For the above to work, however, you will have to replace the YOUR_SPREADSHEET_ID_HERE with the spreadsheet id of the sheet you just created.
The rest of the code above is quite self-explanatory. At the start, we expect a request which we will send via our Flutter app. More about it, below. We also create an object of this sheet by its sheetId. We then read the three parameters, name, sex & age, and then use the appendRow function of our sheet object to append this set of data to the google sheet.
We also return a STATUS text but I haven’t used it anywhere. I just print it in the terminal. Feel free to use it and give the app a more meaningful look.
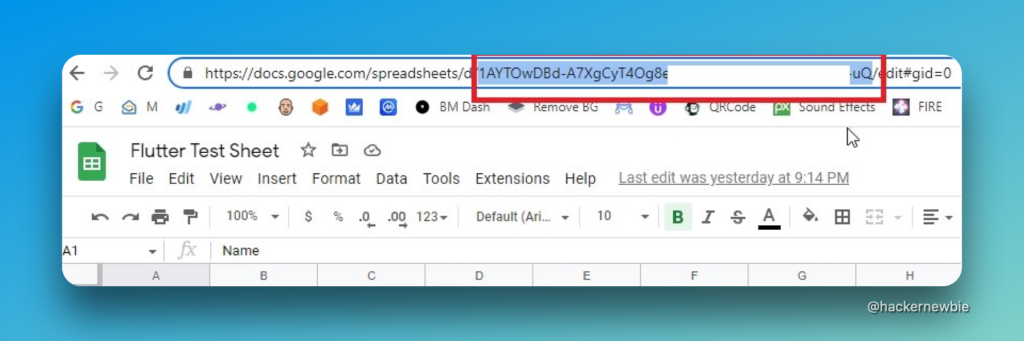
How To Find Sheet Id of A Google Spreadsheet?
You can find your sheet id for the newly created Spreadsheet in the address bar of your browser. Follow the image below to know how to grab it.
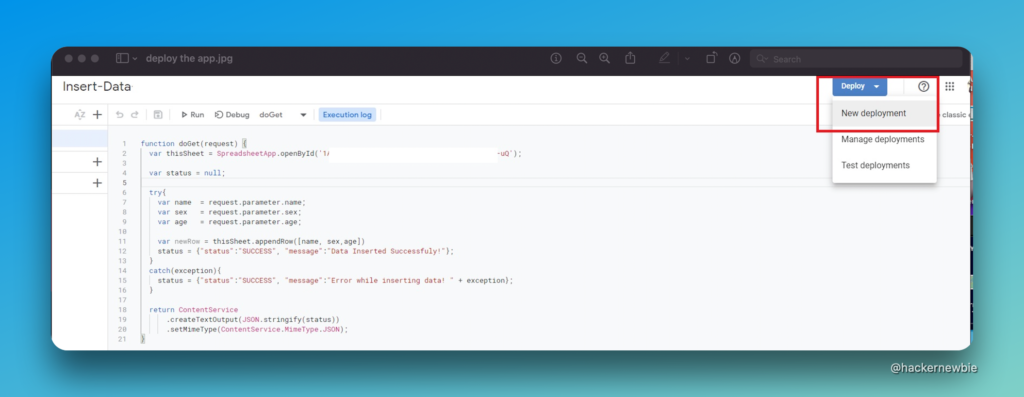
How To Deploy Google App Script?
With our sheet and app in place, it’s time to deploy the script. As I have already mentioned above, we will deeply it as a Web App. To deploy our script, follow the screenshots below:
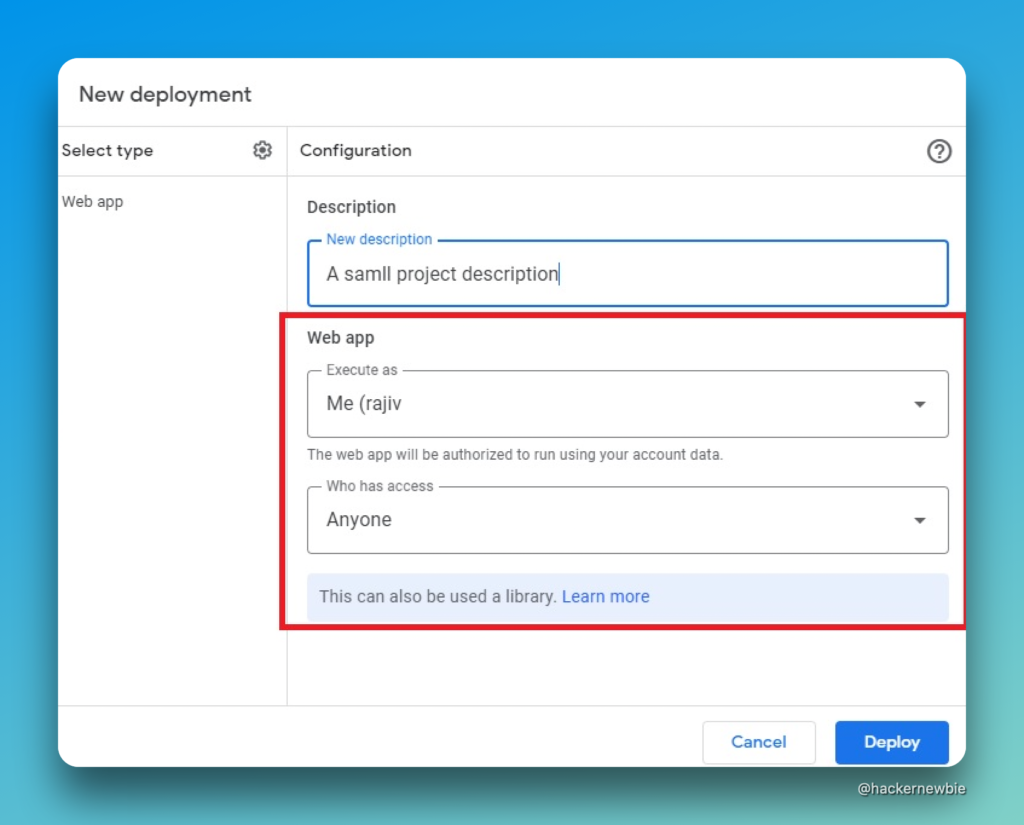
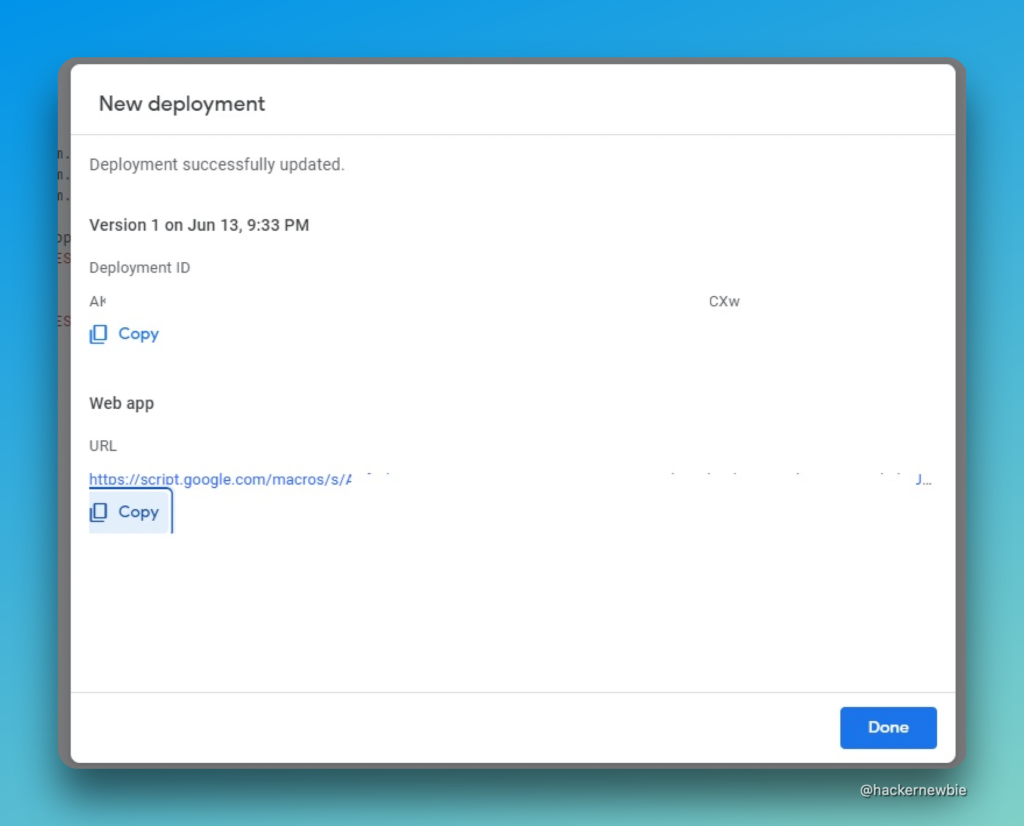
At this moment, our script is deployed as a Web App and is accessible via a URL. In the last image above, you will get the URL, which is the URL we will use in our Flutter app, below. Copy and keep it somewhere for the time being.
Create A New Flutter App
I assume you already know How To Create A New Flutter app. So, I am not going to talk about it here. You can have a look here, if you don’t know how to create a New Flutter app.
With our new Flutter app created, let’s add the only required dependency to our project.
Since we will be sending data to our App Script over HTTP, we will need to add the Http package to our project. So, we will open our project’s pubspec.yaml file and update our dependencies section of the file as below:
dependencies:
  flutter:
    sdk: flutter
  http: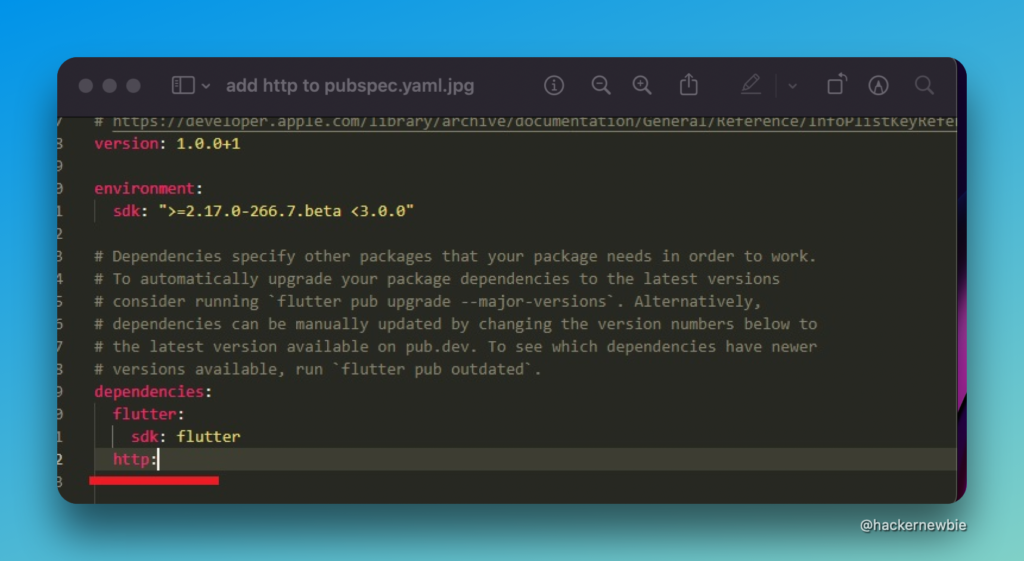
Next, let’s replace all the code in the lib/main.dart file with the code below:
import 'package:flutter/material.dart';
import 'package:http/http.dart' as http;
import 'dart:convert' as convert;


void main() async{
  runApp(const MyApp());
}

class MyApp extends StatelessWidget {
  const MyApp({Key? key}) : super(key: key);

  @override
  Widget build(BuildContext context) {
    return MaterialApp(
      title: 'Send Data To Google Sheets',
      theme: ThemeData(
        primarySwatch: Colors.blueGrey,
      ),
      home: const HomePage(title: 'Send Data To Google Sheets'),
    );
  }
}

class HomePage extends StatefulWidget {
  const HomePage({Key? key, required this.title}) : super(key: key);
  // always marked "final".

  final String title;

  @override
  State<HomePage> createState() => _HomePageState();
}

class _HomePageState extends State<HomePage> {
  final _formKey        = GlobalKey<FormState>();

  /// Controllers
  TextEditingController nameController    = TextEditingController();
  TextEditingController sexController     = TextEditingController();
  TextEditingController ageController     = TextEditingController();


  void _submitForm() async{
    if(_formKey.currentState!.validate()){

      const String scriptURL  = 'YOUR_SCRIPT_URL_HERE';

      String tempName     = nameController.text;
      String tempSex      = sexController.text;
      String tempAge      = ageController.text;

      String queryString  = "?name=$tempName&sex=$tempSex&age=$tempAge";

      var finalURI   = Uri.parse(scriptURL + queryString);
      var response    = await http.get(finalURI);
      //print(finalURI);

      if (response.statusCode == 200) {
        var bodyR = convert.jsonDecode(response.body);
        print(bodyR);
      }

    }
  }


  @override
  Widget build(BuildContext context) {

    return Scaffold(
      appBar: AppBar(
        title: Text(widget.title),
      ),
      body: Container(
        padding: EdgeInsets.symmetric(vertical: 10.0, horizontal: 20.0),
        child: Form(
          key: _formKey,
          child: Center(
            child: Column(
              mainAxisAlignment: MainAxisAlignment.start,
              children: <Widget>[
                TextFormField(
                  validator: (value){
                    if(value ==""){
                      return "Enter a valid value for name";
                    }
                  },
                  decoration: InputDecoration(
                    hintText: 'Enter Name',
                  ),
                  controller: nameController,
                ),
                TextFormField(
                  validator: (value){
                    if(value == ""){
                      return "Enter a valid Sex";
                    }
                  },
                  decoration: InputDecoration(
                    hintText: 'Sex',
                  ),
                  controller: sexController,
                ),
                TextFormField(
                  validator: (value){
                    if(value == ""){
                      return "Enter a valid Action";
                    }
                  },
                  decoration: InputDecoration(
                    hintText: 'Age',
                  ),
                  controller: ageController,
                ),
                SizedBox(height: 10,),
                RaisedButton(onPressed: (){
                  _submitForm();
                },
                  child: Text('Save Details'),
                ),
              ],
            ),
          ),
        ),
      ),
    );
  }
}
In the code above, replace the YOUR_SCRIPT_URL_HERE with your Web apps URL that you had received after deploying the app.
The code above again is quite simple. We create a simple form with 3 fields (for Name, Sex & Age) and a button. On the button click, we send the form data as parameters to the deployment URL of our script. If all is well (response.statusCode == 200), we print a message in the terminal.
Run the app, and if you did everything correctly, you should see the app in your simulator.
Fill in the form and hit the Save Details button and, after a while, you should see a message printed in the terminal saying the process is completed or, in case of any error, a relevant message will be displayed.
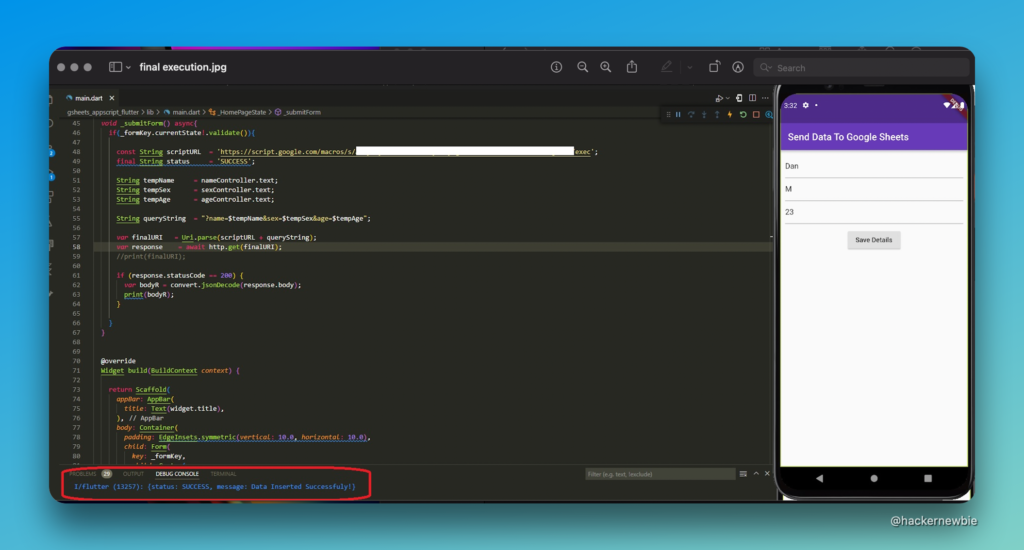
On successful execution, you should also see a new row created in your Google sheet with the data you entered in the form.
If you wish so, you can also download the project from GitHub, here.