
Images and any form of image-processing had never been my forte. So, I had never even thought that I will be trying something like this. But then, one thing leads to another and I am here writing about How to resize image using Laravel and How to write text on an Image using Laravel.
Let’s jump into the steps involved to resize an image using Laravel then.
- Create a New Laravel Project
- Pull in Bootstrap CSS library from here.
- Update the welcome.blade.php file
- Install the Intervention package
- Update the web.php file
- Upload the image and add the text to be added
- Verify changes on the image
Update the welcome.blade.php file
Let’s update the resources\welcome.blade.php. Here, we basically did two things:
We scrap almost all the boilerplate code in the file and replace it with the following:
<!DOCTYPE html>
<html lang="{{ str_replace('_', '-', app()->getLocale()) }}">
    <head>
        <meta charset="utf-8">
        <meta name="viewport" content="width=device-width, initial-scale=1">

        <title>Add Text On Image : Laravel Intervention</title>

        <!-- Fonts -->
        <link href="https://fonts.googleapis.com/css2?family=Nunito:wght@400;600;700&display=swap" rel="stylesheet">
        <link href="https://cdn.jsdelivr.net/npm/bootstrap@5.1.3/dist/css/bootstrap.min.css" rel="stylesheet" integrity="sha384-1BmE4kWBq78iYhFldvKuhfTAU6auU8tT94WrHftjDbrCEXSU1oBoqyl2QvZ6jIW3" crossorigin="anonymous">
        <!-- Styles -->
        <style>
            /*! normalize.css v8.0.1 | MIT License | github.com/necolas/normalize.css */
            html{
                line-height:1.15;
                -webkit-text-size-adjust:100%;
            }
            body{
                margin:0
            }
            a{
                background-color:transparent
            }
            [hidden]{
                display:none
            }
            html{
                font-family:system-ui,-apple-system,BlinkMacSystemFont,Segoe UI,Roboto,Helvetica Neue,Arial,Noto Sans,sans-serif,Apple Color Emoji,Segoe UI Emoji,Segoe UI Symbol,Noto Color Emoji;line-height:1.5}*,:after,:before{box-sizing:border-box;border:0 solid #e2e8f0}a{color:inherit;text-decoration:inherit}svg,video{display:block;vertical-align:middle}video{max-width:100%;height:auto}.bg-white{--bg-opacity:1;background-color:#fff;background-color:rgba(255,255,255,var(--bg-opacity))}.bg-gray-100{--bg-opacity:1;background-color:#f7fafc;background-color:rgba(247,250,252,var(--bg-opacity))}.border-gray-200{--border-opacity:1;border-color:#edf2f7;border-color:rgba(237,242,247,var(--border-opacity))}.border-t{border-top-width:1px}.flex{display:flex}.grid{display:grid}.hidden{display:none}.items-center{align-items:center}.justify-center{justify-content:center}.font-semibold{font-weight:600}.h-5{height:1.25rem}.h-8{height:2rem}.h-16{height:4rem}.text-sm{font-size:.875rem}.text-lg{font-size:1.125rem}.leading-7{line-height:1.75rem}.mx-auto{margin-left:auto;margin-right:auto}.ml-1{margin-left:.25rem}.mt-2{margin-top:.5rem}.mr-2{margin-right:.5rem}.ml-2{margin-left:.5rem}.mt-4{margin-top:1rem}.ml-4{margin-left:1rem}.mt-8{margin-top:2rem}.ml-12{margin-left:3rem}.-mt-px{margin-top:-1px}.max-w-6xl{max-width:72rem}.min-h-screen{min-height:100vh}.overflow-hidden{overflow:hidden}.p-6{padding:1.5rem}.py-4{padding-top:1rem;padding-bottom:1rem}.px-6{padding-left:1.5rem;padding-right:1.5rem}.pt-8{padding-top:2rem}.fixed{position:fixed}.relative{position:relative}.top-0{top:0}.right-0{right:0}.shadow{box-shadow:0 1px 3px 0 rgba(0,0,0,.1),0 1px 2px 0 rgba(0,0,0,.06)}.text-center{text-align:center}.text-gray-200{--text-opacity:1;color:#edf2f7;color:rgba(237,242,247,var(--text-opacity))}.text-gray-300{--text-opacity:1;color:#e2e8f0;color:rgba(226,232,240,var(--text-opacity))}.text-gray-400{--text-opacity:1;color:#cbd5e0;color:rgba(203,213,224,var(--text-opacity))}.text-gray-500{--text-opacity:1;color:#a0aec0;color:rgba(160,174,192,var(--text-opacity))}.text-gray-600{--text-opacity:1;color:#718096;color:rgba(113,128,150,var(--text-opacity))}.text-gray-700{--text-opacity:1;color:#4a5568;color:rgba(74,85,104,var(--text-opacity))}.text-gray-900{--text-opacity:1;color:#1a202c;color:rgba(26,32,44,var(--text-opacity))}.underline{text-decoration:underline}.antialiased{-webkit-font-smoothing:antialiased;-moz-osx-font-smoothing:grayscale}.w-5{width:1.25rem}.w-8{width:2rem}.w-auto{width:auto}.grid-cols-1{grid-template-columns:repeat(1,minmax(0,1fr))}@media (min-width:640px){.sm\:rounded-lg{border-radius:.5rem}.sm\:block{display:block}.sm\:items-center{align-items:center}.sm\:justify-start{justify-content:flex-start}.sm\:justify-between{justify-content:space-between}.sm\:h-20{height:5rem}.sm\:ml-0{margin-left:0}.sm\:px-6{padding-left:1.5rem;padding-right:1.5rem}.sm\:pt-0{padding-top:0}.sm\:text-left{text-align:left}.sm\:text-right{text-align:right}}@media (min-width:768px){.md\:border-t-0{border-top-width:0}.md\:border-l{border-left-width:1px}.md\:grid-cols-2{grid-template-columns:repeat(2,minmax(0,1fr))}}@media (min-width:1024px){.lg\:px-8{padding-left:2rem;padding-right:2rem}}@media (prefers-color-scheme:dark){.dark\:bg-gray-800{--bg-opacity:1;background-color:#2d3748;background-color:rgba(45,55,72,var(--bg-opacity))}.dark\:bg-gray-900{--bg-opacity:1;background-color:#1a202c;background-color:rgba(26,32,44,var(--bg-opacity))}.dark\:border-gray-700{--border-opacity:1;border-color:#4a5568;border-color:rgba(74,85,104,var(--border-opacity))}.dark\:text-white{--text-opacity:1;color:#fff;color:rgba(255,255,255,var(--text-opacity))}.dark\:text-gray-400{--text-opacity:1;color:#cbd5e0;color:rgba(203,213,224,var(--text-opacity))}.dark\:text-gray-500{--tw-text-opacity:1;color:#6b7280;color:rgba(107,114,128,var(--tw-text-opacity))}
            }
        </style>

        <style>
            body {
                font-family: 'Nunito', sans-serif;
            }
        </style>
    </head>
    <body class="antialiased">
        <div class="relative flex items-top justify-center min-h-screen bg-gray-100 dark:bg-gray-900 sm:items-center py-4 sm:pt-0">
            <div class="div">
                <h2>Upload Image</h2>
                <hr/>
                <form action="{{route('image.upload')}}" method="post" enctype="multipart/form-data">
                    @csrf
                        <div class="row">
                            <div class="col-12">
                                <input type="file" name="image_file" id="image_file" class="form-control" required>
                                <input type="text" name="text_to_add" class="form-control my-2" id="text_to_add" placeholder="Type the text you want to add to the image" required>
                            </div>
                            <div class="col-12">
                                <input type="submit" value="Upload!" class="btn btn-sm btn-warning">
                            </div>
                        </div>
                </form>
            </div>

        </div>
    </body>
</html>
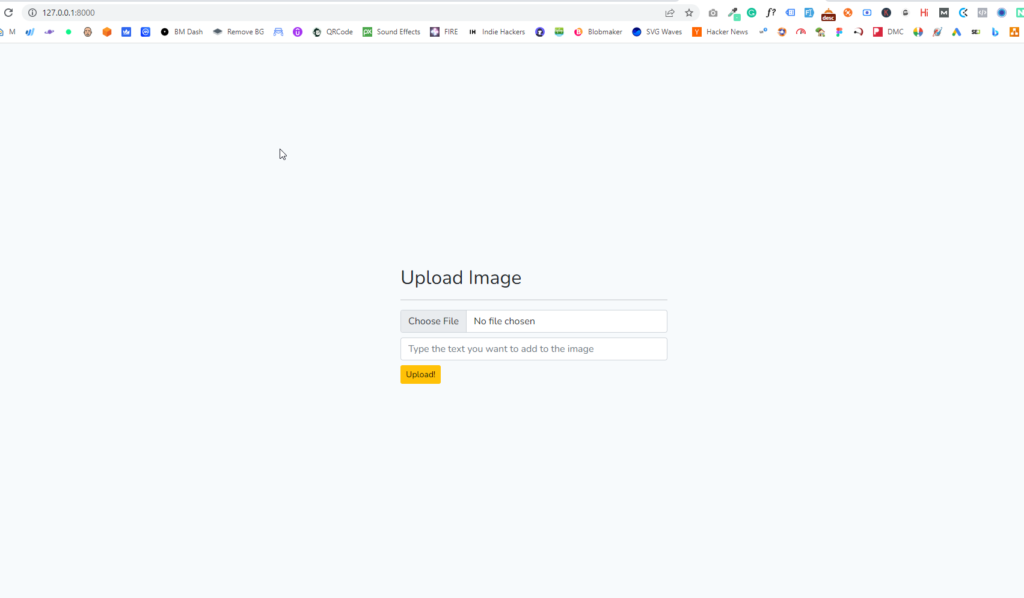
The updated welcome.blade.php will look like this in the browser.
Install the Intervention Package
Open your terminal inside your project’s root and type the following command below:
composer.phar require intervention/imageThis should install the package and you should see something like this in your terminal.

Once we have installed Intervention Image, let’s go to the config/app.php file and add the following lines.
In the $providers array, add the following:
Intervention\Image\ImageServiceProvider::classThen, move to the $aliases array and add the following, towards the end of the array:
'Image' => Intervention\Image\Facades\Image::classNow, let’s create a new controller where we will write our actual code. While you can also do the same in the web.php route file itself, I am not a fan of writing anything in the route file so I would instead create a new Controller, even if the code that we are going to write is tiny.
Let’s create the controller then, by typing the below-given code in the terminal.
php artisan make:controller ImageController
Update the web.php file
Let’s do a quick update of the web.php route file.
Route::post('upload', [ImageController::class, 'UploadImage'])->name('image.upload');Breaking Down The Logic
Now that the controller is ready, let’s first have a quick look at what are we trying to achieve.
public function UploadImage(Request $request){
        $path             =   $request->image_file->storeAs('public/images',$request->image_file->getClientOriginalName());

        $uploadedPath     =   'storage/images'.'/'.$request->image_file->getClientOriginalName();
        $storageDir       =   'storage/images/processed/';

        $img = Image::make($uploadedPath);
        $img->resize(500, null, function ($constraint) {
            $constraint->aspectRatio();
        });

        //$img->text('This is a example ', 10, 10);

        $img->text($request->image_file->getClientOriginalName(), 10, 10, function($font) {
            $font->color('#f9f9f9');
            $font->align('left');
            // $font->angle(45);
        });
        //$img->blur(10);

        if(!File::exists($storageDir.'\''.$request->image_file->getClientOriginalName())){
            File::makeDirectory($storageDir, 0755, true, true);
            $img->save($storageDir.$request->text_to_add.'.png',20);            /// Last param for image quality
        }
        //dd('Done!');
        return "Image Processed";
    }
In order to achieve our objective of resizing and adding a line of text to it, we will essentially do the following:
- Upload an image and store it in the storage folder of our project.
- We will use the Intervention package to resize the image.
- We will then use the Intervention package to write a line of text that the user enters in the text field while uploading the image.
- We will create a new folder called ‘processed’ under the storage folder of our project and save the processed image here.
All the above things are taken care of by the following few lines of code in the controller.
While this is enough for our simple How To Write Text on image in Laravel example, the Intervention package is huge and offers countless possibilities and customizations. I highly recommend you spend some time exploring the package’s documentation here.

If you wish to, you can also download this project from my GitHub repo, here.