
Sending notifications to users is one of the most important tasks of any Laravel application. So, as you might have already guessed, sending notifications in Laravel is very easy to implement. However, while setting up the functionality to send notifications (in the form of emails or otherwise) is pretty easy, email servers do take significantly longer to actually send the email(s).
This, in turn, results in pausing the execution, thereby, resulting in a bad user experience.
Queues in Laravel solve this problem by storing the notifications to send them later, without coming in the way of the UX.
How To Setup Queues in Laravel?
Setting up Queues in a Laravel project is quite simple and involves only a handful of steps as listed below:
- Update the .env file
- Import the ShouldQueue class in your Notification class
- Implement the ShouldQueue interface in your Notification class
- Generate the database tables to store the queued data
- Migrate the tables
- Run the queue
Update the .env file
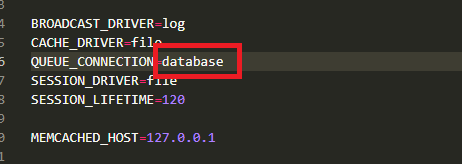
Queues can be implemented for various drivers, from relational databases to Redis and more. In our case here, we will be using a MySQL database so, as a first step, we need to tell our preference. To do that, open the .env file of your project and look for the key name QUEUE_CONNECTION. The default value here will be (as of Laravel 8.x) sync.
QUEUE_CONNECTION=databaseChange this value to database and save & close the file.
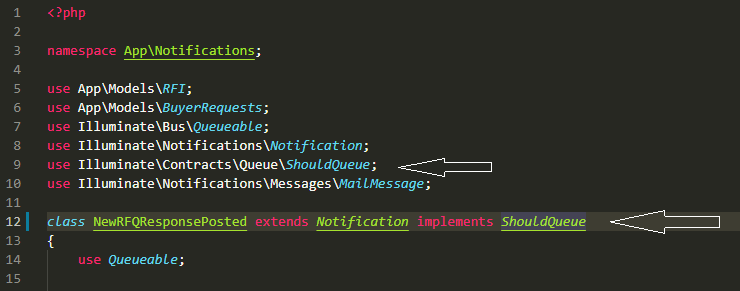
In order to be able to Queue a notification in Laravel, the notification class itself should use and implement ShouldQueue. In order to do that, add the following line of code to the top of the notification class (for example, NewUserRegistered.php).
use Illuminate\Contracts\Queue\ShouldQueue;Then, below that, change the class declaration line to this:
class YourNotificationClassName extends Notification implements ShouldQueueIt should look like this, with your notification class name of course.
Generate and Migrate Database Table To Store The Queued Data
Now, we will have to create the database table that will be used to store the queued data. Laravel makes it very simple to create this table with the help of one quick command.
Use the following command to generate the migration for the table in question.
php artisan queue:table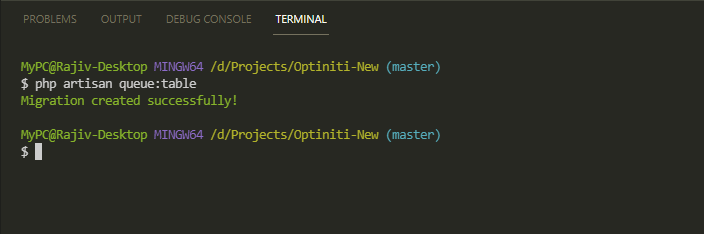
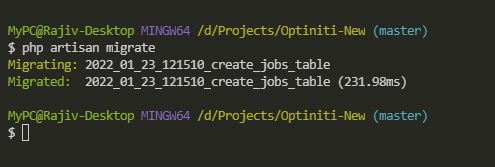
Once the migration is created successfully, migrate the table by running:
php artisan migrateAnd at this point, your project is ready to use queues for sending notifications.
However, if you try to send a notification from within your application, the notification (email or otherwise) will not be sent. Not even after a few moments. This is because, now that we are using queues, this process of sending notifications has been now detached from the main process, in order to make the UX better and faster.
So, what do we do now? How do we get the emails flowing again and not come in the way of application speed?
To do that, we will have to run one more command that will start the worker.
Type the following command in your terminal to do that:
php artisan queue:workNote that this terminal should keep running, just like your php artisan serve for it to keep working.
Laravel Queue implemented but notifications not sent
If you notice that even after doing all the above-mentioned steps correctly, the notifications are not being sent, check your .env file.
It should have this key-value pair:
QUEUE_CONNECTION=database
The QUEUE_CONNECTION value sometimes defaults to sync which should be changed to database in order for the Laravel queue to work correctly.
Make the change and save the file. Then, clear the cache by running the following command:
php artisan config:cache
Now, run the queue worker again and it should work fine this time.
**If you change anything in the Notification classes, for the changes to take effect, the queue worker should be restarted.

3 thoughts on “How To Implement Laravel Queues To Send Emails and Not Spoil The User Experience?”
Pingback: How to send notifications in Laravel 7.x? - Rajiv Verma
Pingback: How To Create a Custom Laravel Command? - Rajiv Verma
Pingback: How To Protect Your Laravel Forms from Spam Entries: A Complete Guide