
Over time, I have slowly started to move from shared hosting to self-managed servers like Digital Ocean and AWS, for all of my websites. Even to most of my clients, I now recommend a dedicated hosting over shared hosting if they are going for an AMC with me for my web development services. My personal favorite between the two is AWS so, I will talk about the same in this post. To me, the little extra initial work in setting up a server instance on AWS far outweighs the benefits of having an AWS server in the long run.
Last night, I moved another of my website to an AWS server from a shared-hosting which is about to expire in a few days. Since a lot of people, especially those who have never done this before, feel a little apprehensive about setting up a server all on their own, I thought of writing this quick guide to creating a new Amazon Web Services (AWS) account from scratch.
How To Create a New AWS account : Step-by-step Guide
Creating an AWS account is slightly different from creating an account on a shared hosting service provider. However, in no way, it is complex or confusing. In fact, it is so easy that, I even find this post about how to create a new AWS account pointless because almost anyone can just land at the signup page of AWS, can just follow the instructions, and be done with it in a matter of few minutes. But, now that you are here, here are the steps involved:
- Proceed to register for a new AWS account
- Fill in basic user details
- Fill in account type details and basic contact information
- Fill in your payment information
- Fill in your primary contact number
- Verify phone number
- Select the support plan
- Log in to your AWS console
Let’s go in the details of each step now.
1. How to Create an AWS Account: Proceed to the Signup page of Amazon Web Services (AWS)
This is self-explanatory. Go to this link https://www.aws.amazon.com and click on Create Free Account to get started. Clicking on that takes you to what you will see in Step 2, below.

2. Fill in basic user details
In the next step, just like any other service registration, you are presented with a form. Pass in your basic user details such as the email id you wish to associate with this new AWS account, the password for this account, and a name that you would like to give to your account, as per your choice. I personally create a new email id each time I am going to create a new AWS account for any serious website I am going to host there. This goes a long way in keeping things organized.

3. Fill in account type details & basic information
In this step, choose whether you are registering for Professional or Personal use. I was going to use this account for one of my personal websites so I selected Personal, you should be entering based on what you are going to use the account for. Then, proceed with filling in your name, phone number and other asked for details and then proceed to the next step by clicking the button at the end of this page.

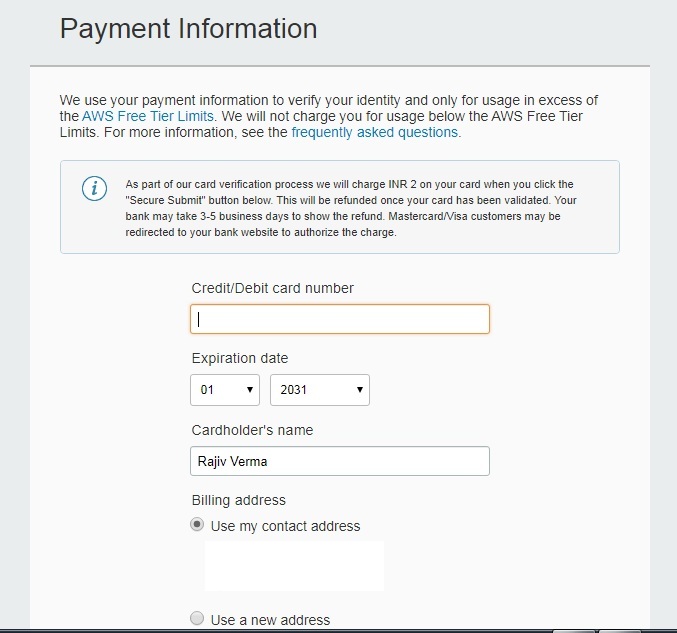
4. Fill in your payment information
In this step, fill in your payment details. An international credit or debit card is to be used here. Please note that, if you have your international transaction facility disabled for your card (in case of an Indian credit card), the process will fail.
So, before going ahead with this step, make sure your card is enabled for international transactions. In order to successfully verify your card, Amazon deducts a small amount from your card (Rs. 2/- in case of an Indian card). The same is refunded to your credit card account in a day or two.
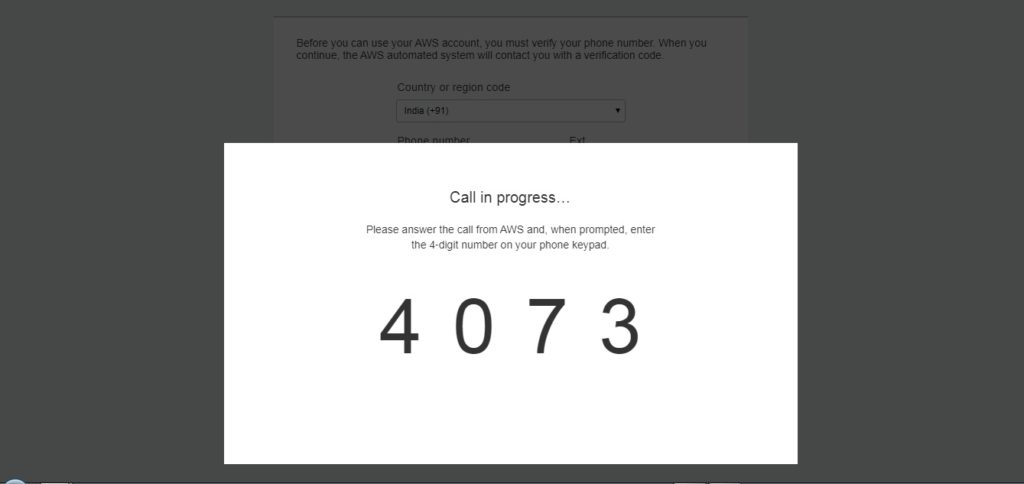
5. Enter and verify your primary contact number
Amazon wants to make sure each account being registered is valid so they put in strict verification protocols to ensure the same. To complete your registration, enter a valid mobile number of yours. To verify the same, you will receive an automated call from Amazon US in which, you will have to enter a 4-digit verification code that you will see on your screen after you click to verify your mobile number.
6. Select your Support Plan
This is slightly different from how things generally are with a shared web hosting provider. When you register for an Amazon Web Services account, you can choose from 3 types of support. Please note that support here generally means issues related to the infrastructures, billings, accounts, etc. and not much about issues on your server(s). Your servers have to be configured by yourself or you have to hire someone to do the needful for you.

Once you have selected your support plan, you are all done from your end. You will then be asked to choose your personalization preferences but this is not critical to your registration.

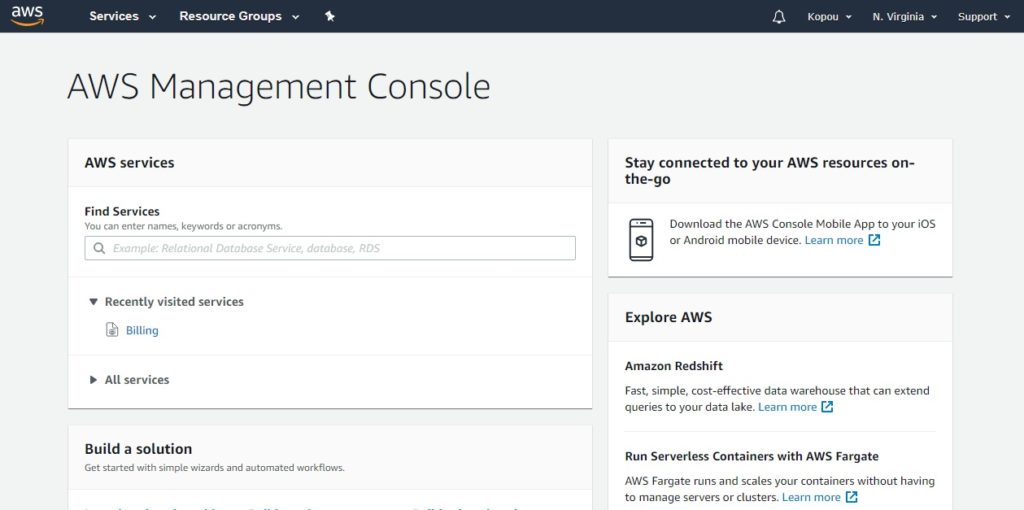
7. Login to the AWS Console
While your account activation will take a while as it has to be manually approved by the AWS team, it will be a few hours before you are able to use it. However, you can always log in to your AWS Console using your newly created AWS account.
This is how it should look once you login successfully.
Now you are ready to use all the services Amazon Web Services provided. I have already written about Lightsail on AWS, hosting websites on EC2 Instance of AWS, and how to set-up an SSL certificate on Amazon EC2 Instance. Feel free to go through them if you feel they will be helpful to you in better understanding the workings of this aspect of AWS.
Hope this helps!


7 thoughts on “How To Create a New Amazon Web Services (AWS) Account?”
Pingback: How To migrate a Website from Amazon EC2 To Lightsail on AWS
Pingback: How to access phpMyAdmin to connect to AWS Ubuntu Instance?
Pingback: How To migrate a Website from Amazon EC2 To Lightsail on AWS
Pingback: How to point a domain name to a Lightsail Instance?
Pingback: What do I do if My 2FA token is always invalid? - Rajiv Verma
Pingback: How To Upgrade PHP on Amazon Lightsail in under 15 minutes?
Pingback: How to forward a domain to another website URL - NameCheap?